Showing posts with label sewing. Show all posts

Thursday, February 18, 2010

First stitch out

Here is the first stitch out of the large looped vine onto the hummingbird fabric.

Not bad, it might blend a bit much or maybe I just don't love the placement.

But the concept is solid, so I will continue to play with it.

It really is about adding the darker blue and a bit of texture, so it might work ....


Monday, February 15, 2010

Little bits of blue

So I went through the design and pulled out my three favorite bits - a looped vine like piece, a striped and dotted leaf, and a flower with nice needle work edges.

And of course being able to use the software to pull them out wasn't enough - I had to play with the sizing as well. Because I can do that. Not just the 20% scaling that the embroidery machine can do, but really play with the size until I found what I thought might work well with the fabric.

Here they are test stitched - because even having made them the sizes I think I want I had to test stitch the designs out. Nothing really helps me envision a project like seeing the designs in thread.

So far the looped vine is my favorite. But I am thinking I will plan out a pillow, stitch on the actual fabric and go from there.

With this project I am really trying to relax and enjoy the process and not worry about getting the pillows done. This one is about learning some of the software and making something fun for me with fabric I really like.


Tuesday, February 9, 2010

A method to the madness

I have looked at the fabric and the embroidery design a hundred times and keep thinking they have the right vibe for each other, like they will be a good couple if I can just pick the right pieces to compliment each other.


So because I always do, I thought about test stitching the entire design. But only in one color - because that would be slightly faster. It gives me a real size sample to work with and I get to know the design a little better. Get a better feeling for the textures, the order the components stitch in, that sort of thing.


Then I realized - I will never use the entire design for this particular project. It would be a waste of time and effort and my madness can be better used elsewhere. Like editing.


When I bought my machine it came with a basic organizer program for the embroidery designs. I quickly learned that was not enough and have been tinkering around with the Husqvarna Viking 4D Professional. And I really do mean tinkering. There is so much to learn and so many possibilities.


But just selecting what I want, copying it into a new design? That is cake! Which means I can take this:


And systemically select, copy and paste each component I want to play with into something like this:


And while that lonely little leaf doesn't look like much all by itself, the ability to pull it out this easily - that is power and potential.

For anyone who enjoys machine embroidery you understand that this opens a gigantic door for my creative side to run through at top speed. This means I'm only limited by my imagination and
my sewing supplies.

Thursday, February 4, 2010

Just a little something else

So now that I know the chocolate hummingbirds are destined for throw pillows I keep looking at the fabric - and it needs a little something. Like a touch of navy. So I am thinking a coordinating navy fabric and a touch of embroidery.


The fabric is easy, I have plenty leftover from the previous pillow project. But the embroidery, needs to fit with the hummingbirds and the room. So I have been looking through the embroidery collections on my shelf searching for one that screams modern and organic. None of them are screaming. Then I looked at Husqvarna Viking Embroidery Collection #204 Elegant Art.


The designs are organic and a bit sketchy. But none of them are perfect. They are all way too big for this particular project, but have such potential. #10 is my favorite so far, the needlework is lovely and the components are unique.


Monday, February 1, 2010

Chocolate Hummingbirds

Pastels do nothing for me. They just don't. Nothing inspiring or comforting even. So try as I might to live with a pistachio bedroom - I failed. I recently replaced the pistachio walls with something warmer and way more me - chocolate!

Which means the pillows I embroidered, the ones that I made trying to desperately live with the room are in the market for an update.

An update that involves a very happy chocolate hummingbird based fabric. So today I will be starting on some new throw pillows and table runner!

Saturday, January 30, 2010

Warmer Weather

I have fallen for my fair share of fabrics over the years. You know the ones - they grab your eyes and your attention. Some of them end up orphans in your stash others get worked into a project or two.

But then there is "that" fabric. You know the one. You see it and immediately you are inspired. You can't stop thinking about things to make with it. Your head spins with possibilities.

I found one of those today!

It is Legacy Studio's Fresh Fusion Large Spring Floral. I don't know if it was the dahlias or the hummingbirds, the happy but not gaudy color combination or the yummy hint of chocolate brown, but when I saw this I had to have it!

It is destined to either become the much needed new shower curtain in my upstairs bath or throw pillows and a table runner in my bedroom.

This fabric assures me that warmer weather is coming and I can bide the time sewing away enjoying the creative process and waiting patiently for blue skies and everything Spring has to offer.


Monday, August 24, 2009

What a glorious weekend

Ok, it wasn't really. Saturday was grey and rainy and cold enough in my corner of Northern Ohio to close the windows while I sewed and embroidered my little heart out. But - the pool robe is finished!

It was so cold and yucky out that I didn't even want to go on a supply run for some lightweight interfacing. I was going to use it in the sash to give it a little body so it didn't get all scrunched up when she wears it.

Then I had a light bulb moment. Why not use something I have readily available as a replacement for the interfacing? I swapped out some Inspira Light and Soft Fuse On stabilizer for the interfacing and it worked great!


I also added some embroidery to the back of the robe. I cold have gone with some applique like in the tutorial, but why have a sewing and embroidery machine if you aren't going to use it?

Embroidering on the terry cloth of the towel concerned me a bit at first (I have heard horror stories about it not turning out well - everything from the embroidery design getting lost in the pile to major registration issues). But I dove in head first.

This method worked awesome for me (I was sooooo not going to try to hoop the towel):
- hoop a double layer of tear away stabilizer
- use some KK2000 to adhere the robe/towel to the stabilizer
- top the robe/towel with a lightweight water soluble stabilizer
- use the FIX function in my machine to baste the stabilizer, towel, topper sandwich
- embroidery away

The tear away stabilizer was so easy to get off the inside of the robe and didn't leave any scratchy bit for my little girl to complain about, and the topper dissolved away so easily.

So here it is, ta da ..... one completed Summer Pool Robe! And let's hope there is enough Summer left for her to use it!


Tuesday, August 18, 2009

Pool robe progress and a new sewing tool ...

Progress on the pool robe is going so well!

I was way too nervous about sewing the two layers of terry together. My sewing machine ran over the terry like it was nothing. No snagging, no tension issue, no adjustments, it was amazing. I didn't even use a teflon foot or anything special. Seriously, made my selection on the sewing advisor, selected a zig zag stitch and went. I got the shoulder and side seams done in one sitting.


And we even have a first fitting to share:
The sleeve shape came out so well, super scientific measuring worked, and the wrap shape is a go! Talk about an all around win.

I can't decide if I want to tackle the binding, sash or embroidery tonight.

I have this little Bias Binder I wanted to try, so tonight might be about making my own Bias Tape. I have had mixed results in the past, so I am hoping that with the help of this tool and my machine it will be much simpler.

Here is the information that swayed me towards this little guy:

"To bind edges with 1/2" (12mm) Bias Binding, cut a 2" (50mm) wide bias strip of light weight fabric, or use packaged extra wide double fold Bias Binding. Straight stitch, length 2.5, or zig zag, or decorative stitch at desired length.

1. Snap on Bias Binder.

2. Cut the end of the bias tape to a point. Insert the bias tape from the outside of the funnel guide, into the slot and pull it down under the foot.

3. Place the edge to be bound into the groove on the left side of the funnel guide.

4. Adjust needle position as needed or to adjust the position f the binder funnel/guide loosen the screw on the top of the foot and position the funnel guide as needed."

If this means I can make all the bias tape I want, with any fabric I want (ok, almost) and attach it with ease sign me up for a new tool in my sewing tool box.

Monday, August 17, 2009

Fuchsia fluff

I have little bits of fuchsia fluff everywhere!

Upcycling, recycling, restyling, whatever you want to call it has some serious benefits, both for me the sewer and the environment. But working with a towel? What was I thinking? That nice deep pile of terry has turned into fluff all over my sewing area.

Steps so far have been:
  1. Fold the towel in half
  2. Measure towel and child
  3. Determine and cut sleeve shape
  4. Cut side seam
  5. Cut towel along fold to separate the front and back pieces

    Here is this weekends progress ...
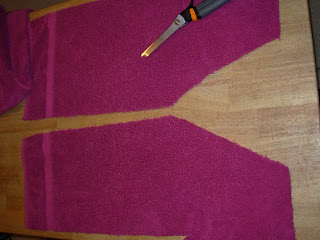
This is the back piece folded in half perpendicular. Then the sliver of what will be the back of the neck was trimmed away.


I wanted more of a feminine wrap style, so instead of the round neck from the original tutorial I cut this into a V. If I make this robe again I might exaggerate this a bit more and put it off center to really push the wrap shape.

Here is the front split open. This is where my "fabric" started to look like pattern pieces (instead of a towel that got a little bleach splatter on it and was finding a new life).

Tonight will be all about the sewing. I think the side and shoulder seams are next. I am a little concerned about sewing the layers together - the terry is very fluffy and with two layers could be a beast. It's not as cumbersome as a quilt or even a bag with multiple layers and interfacing, but I am contemplating using a walking foot anyway. I'm also going to go back to my User's Guide and read through the Sewing Advisor section again, having the stitch length and tension set for me was so nice on a little bag I can't imagine what it will be like on this!

Thursday, August 13, 2009

A real purse!

My first little Buttercup Bag is almost complete.

Look how cute it is turned right side out!

It is finally not so pink, so my fabric choice for my test run is definitely paying off.

Once I stitched the lining and exterior together and turned it right side out I started to wonder - why didn't I tack these pieces together so the lining doesn't shift? It may not be a big deal based on the size of the bag, but will probably end up on my to do list for the next one I make.

The other thing I noticed is the strap. Since it is the last step you will be able to see it attached inside the bag. That bothers me a bit. After all my effort making the bag I would really like more professional looking results.

So another item for my to do list for the next bag - attach the shoulder strap in the process of sewing the lining and exterior together.
But look how cute the bag is! Like a real purse - and I made it! Well, almost, I still have to make and attach the shoulder strap, but I am really liking this bag!


Wednesday, August 12, 2009

A great little bag


My little Buttercup Bag is coming along so nicely!

Here are the interior and exterior pieces ready to be sewn together. Yes, I am a pin fanatic. I think I over pin because I am so worried about seems lining up nicely and maintaining the shape of things.

You work so hard cutting them out precisely and joining that I get a little pin crazy trying to get the best end results possible.

I have to say I think all my pinning paid off. Fitting the lining and exterior together was a breeze!

Any my machine didn't care one bit about all those pins. Just whizzed over them like nothing!

A little more sewing tonight and tomorrow you should get to see something that looks like a real bag!

Tuesday, August 11, 2009

The Buttercup Bag is coming together!

This bag seems to be taking me forever! But in reality it has been so quick to cut and each step has been rewarding.

Sometimes you sew and the steps don't really make sense, but you follow the pattern hoping for the best. This bag isn't like that at all. Each step has great diagrams and the instructions are just fantastic.


Here are the interfacing and snaps attached to the lining. Next time I will probably use a heavier fabric or use a light weight interfacing on the entire lining. I really like the results I get when I use the Inspira Light and Soft Fuse on stabilizer as an interfacing.

Shaping the lower portion of the exterior of the bag was super simple. Just mark the pleats from the pattern, pin them, and run a few stitches to hold them in place. I'm not sure if it was the size of the pleats, the quantity, or the size of the bag, but making these pleats was easier than any other pattern I have EVER made. Hands down, if you avoid darts or pleats, don't worry about them with this pattern.
I also have to tell you that in the process of making this bag I have found yet another super feature on my Topaz 30. It is this little button with a pair of scissors on it. This little CUT function was so easy and such a time saver. I can not tell you how much I am going to use it when I quilt!


Once the pleats are in place on the lower portion of the bag, the upper portion of the bags is attached. Then that is topstitched and you magically have shaped the exterior of the bag.


From the way this bag is coming together I have to tell you I see more on my to do list in the future!

Thursday, August 6, 2009

Sew something!


In the category of good news, my little Buttercup Bag is progressing. And even though it is still slightly pink I am pretty happy with my fabric choice.

The interior and exterior are cut, all that is left is the strap and hopefully I will get to that tonight. It seems like I have been planning and cutting forever and haven't been at my machine in days. I just need to get through this phase and find enough time to make a real dent in this bag. I can't wait to sew something!

In slightly related news ... do you ever have fabric guilt? You picked it out, you either had the perfect project in mind or you stashed it away, then when it is time to use it - you don't want to cut the fabric.
If you cut it, all the potential projects are gone. You are committed to making this one thing with it.

So I finally cut the exterior pieces of my first Buttercup Bag and my scraps still had some of the little flowery shapes intact. I looked at them, and couldn't throw them away! They looked so sad. All their potential was headed straight to the trash can! So I fussy cut them. And saved them.

You may see those little flowers again. Maybe I could use them to practice my applique skills? Try a little raw edge applique on a hoodie for my girl. Or I know my Topaz 30 has three different basic satin stitches and then four different shaped or scalloped ones. Practice makes perfect and machine applique is definitely a technique I would like use in the future.

Tuesday, August 4, 2009

Progress is good?

The lining for the buttercup bag is cut and I started another bead crochet bracelet!

But I am sensing a theme .... pink.

The bag is beginning to look like neopolitan ice cream. And the bracelet which is size 6 raspberry lined clear seed beads and 4mm raspberry lined blue cubes is looking a little Barbie pink to me.

I will continue working on both, and keep you posted on their pinkness and general progress.


Monday, August 3, 2009

Weekends are wonderful

After fretting last week about so much to do and so little time, I had a most lovely weekend!

Saturday was spent anchoring out on the north side of Kelley's Island. There is a fantastic public beach set in a lovely little cove. The day was spent enjoying the sunshine and blue sky with friends and family.

Beyond the relaxing, I accomplished sew much! Forgive the pun, but it really is true.

Remember the Sew, Mama, Sew Summer Skirt Sew-Along? The skirt now has side seams! And it gets better. I got to test drive the Sewing Advisor on my Husqvarna Viking Topaz 30. It rocked. No dials, no playing around with the tension, I literally with the press of a button told the machine what kind of fabric I was using and my stitch length, tension, everything - set for me!


The Buttercup Bag, from Made by Rae? Pattern printed, cut out and fabric selected! I rummaged through my stash and found two coordinating prints that have more than a fat quarter a piece.


And the fun doesn't stop there. The other item on my to-do list, the Pool Robe? Towel located with coordinating scrap fabric for the bias tape and sash!


The fun doesn't stop there. I even whipped up some earrings for myself to start the week off with some sparkle. A little sterling silver chain, two odd pearls and a pair of amethyst briolettes and I have a little present for me!


Now I have three projects going at once, but I'm not as worried about Summer slipping by!

Thursday, July 30, 2009

Skirt Sew-Along: Scissors in Action!

I get to cross something off this week's list!

The skirt pieces are cut for the Sew, Mama, Sew! Summer Skirt Sew-Along. The waist piece still needs cut, but shhhh. I am bathing in the joy of accomplishing something.
On a not so happy note, the pieces look huge. So even though I measured, re-measured and triple checked before I cut - something could be wrong.
But that is OK. This skirt is the prototype for many a perfect A Line summer skirt to come. That is why the crazy fabric and adhering to the summer deadline.
In my imagination I have a little army of perfect A Line skirts in my closet. Dark denim, chocolate brown, camel ... all just waiting to be part of a wardrobe I made myself.

Monday, July 27, 2009

Summer Skirt Sew-Along: Measuring Again

Would you believe that I measured for a Straight Skirt, Fitted Waist when I really wanted the A-Line skirt, Elastic Waist?

And here I couldn't figure out why I needed four pieces of fabric if I was cutting on the fold and why the directions were telling me to add a seam allowance that was already in my measurements. Ooops.

Now the directions make sense

"Because you pull the skirt on over your hips, the waistline is based on your hips (B) instead of your waist (A). The D measurement is the desired length plus 1" (hem) and 2" (waistline casing). Cut two identical pieces (for front and back)."

So let's try this again!

Sunday, July 26, 2009

Summer Skirt Sew-Along: Taking measurements

I have wanted to make a skirt all summer long, so the sew along is perfect.

I need to start by taking some basic measurements, but I keep procrastinating. How can I make a skirt without a pattern? Yes, I know this is the premise of the book. Yes, I know I have done it for years with Halloween costumes and other miscellaneous projects. But - can I make something worth wearing out of the house without a pattern?

It seems completely logical.

Waist = 36" + 2" seam allowance + 2 " ease = 40" divided by 4 = A
A = 10"

Hips = 48" + 2" seam allowance + 4" ease = 54" divided by 4 = B
B = 13.5"

Waist to hips = 8" + 2" seam allowance = C
C = 10"

Desired length = 19" + 1" hem + 2" seam allowance = D
D = 22"

Some project notes at this point:

- My desired length makes the skirt to my knees. Once the skirt is together I can try it on and see based on the shape if top of knee, knee cap or just below is best.

- I'm a little concerned about the waist measurement. I'm not sure based on my shape if an A starting at my natural waist is a good choice or if it would be better sitting on the top of my hips. Again, worth trying on the skirt and adjusting as necessary.

- Some of the measurements are divided by 4 because the front and back is cut separately, how should I work with the fabric pattern and how careful do I need to be with the seams?

- Based on the fabric I selected for the trial run, does a lining of some sort make sense?

Machine notes:

- There are some machine features I want to use as I work through this skirt.

- The FIX function in sewing mode replaces the need to backstitch (wow).

- The Sewing Advisor "... automatically sets the best stitch, stitch length, stitch width, thread tension, sewing speed and sensor foot pressure for your project. The stitch is displayed on screen with presser foot and needle recommendations."

Next

The next step is to mark out my measurements on the fabric and follow the instructions ....

Thursday, July 23, 2009

Summer Skirt Sew-Along Started .... sort of

Can you say you have started a project if you have only selected the fabric and pattern? Does that count?

For the Summer Skirt Sew-Along over at Sew, Mama, Sew! I have already picked out the pattern from the Sew What Skirts Book. There is a classic A-Line with an Elastic Waist on page 19. It looks super simple, all you need are some basic measurements (waist, hips, waist to hips, and desired length) to complete the skirt.

I finally found fabric! It was the end of a bolt, so it was totally affordable. And it has black and camel which means it will fit into my wardrobe very nicely. I really want to make a skirt out of the new Joel Dewberry Antler Damask, but only after I perfect the pattern and sewing technique.

Here is the fabric I ended up ...


Tuesday, July 21, 2009

More sewing and embroidery projects - completed!

I played with the fabric, I played with the thread and now I have two lovely embroidered pillows for my bed.

I made the pillow covers from curtain panels. Just measured the pillow forms I had on hand, cut the curtains, embroidered my designs, and sewed a few seams.

The curtain panels look like silk dupioni but are really polyester. The blue one is an extra from the set picked up at Pier One. The green one is from a bathroom I had two houses ago.

I have to share how well my machine handled the slippery fabric! No pulling, no gathering, no tension issues! I used a straight stitch and the basic A foot that came on the machine, super simple.

Talk about sew green - the only purchased for this little project was the embroidery design collection (thank you myembroideries half off summer sale!) and the variegated thread. Both will be put to good use again I assure you.